New in the game – “attachment bridging”, a slightly easier way to do “node skipping”, with the added benefit that the attachment indicator now shows where the bridged attachments are:
Release notes:-
Implemented “attachment bridging” feature and added option to BuilderToolExt script mod to enable it.
Added option to the selection GUI to disable selection of locked neighbouring parts.
Enabled rotary, linear, and linear rotary attachment types for pulleys.
Enabled rotary bearing attachments for angled connector parts.
Enabled rotary bearing attachment on steering arm part.
Added resizable “scaffold” axle part.
Removed TweakEnergyStore variable, tweaking of battery charge remaining now automatically prevented when energy consumption is enabled.
Added LimitedPartBehaviourTweaking variable, enabling it limits part behaviour tweaking to player input (e.g. key binds) only.
Added setting to video options that allows for the selection of exclusive or borderless full-screen, or windowed screen mode.
Added setting to game options to turn off “Start Here!” help message.
Added error message popup shown when attempting to unfreeze an intersecting construction.
Updating localised strings with Russian translations thanks to Ludanton!
There will be a 10% launch discount until November 15th, so be sure to take advantage of that. Also, you can help out a lot by leaving a review on Steam.
Here’s a quick preview of what to expect if you buy the game:
Thanks for your patience and support over the years, I hope you enjoy the game. I have plans for some exciting post launch updates, but as always let me know what you’d like to see!
Hello all, GearBlocks is now participating in the Steam Next Fest, from October 9th to 16th!
I’ve made an all new demo available just for this week, with the tutorial scenario. You can learn more about building in the game, and also try out some new parts, so be sure to check it out: GearBlocks on Steam
The old demo is still available in the 0.7.8657 build branch.
Hey everyone, it’s been months since my last dev blog update! As you will hopefully have seen, I recently announced the coming release of GearBlocks into early access for November 9th.
A lot of my time lately was spent preparing for this announcement. The trailer video was the biggest chunk of this work: planning, building content in game (including many new built-in constructions!), capturing footage, and editing it all together. I also improved the Steam store page and website with new screenshots, gifs, blurb, presskit, etc.
Tutorial scenario
I recently took the game to a local indie meetup, and had a few people try out the tutorial scenario. It was really useful and informative to watch people play it in person. The feedback was somewhat sobering though, some found it too complicated and struggled with information overload!
So I made some changes to the tutorial to try and simplify the information presented to players, and added more code to handle edge cases where players were getting stuck.
I’ve also set up a new build configuration for a special demo build with just the tutorial scenario in it, which I’m planning to use for the Steam Next Fest (coming on October 9th).
Lua scripting
I’ve continued to improve the Lua scripting interfaces, exposing more properties and methods for manipulating parts and constructions, adding more tool interfaces, and more vector / quaternion math stuff.
Further improvements were made to some of the included script mods, including the builder tool extensions (now with the ability to set / snap the pivot position & orientation, change the manipulators to work in world or local space, etc.)
Kit building
For the trailer video I wanted to show time lapses of some constructions being built. I also want to try creating scenarios where the player follows instructions to build pre-designed blueprint constructions, a bit like building from a model kit.
So I implemented a feature I’m calling “kit building”, to cater for both of these situations. Parts can now be assigned a stage index and constructions have an active stage that can be set (where any of their parts in higher stages than the active one are hidden).
I made a script mod tool for setting part stage indices, and previewing a construction’s stages. I actually used this tool when capturing for the trailer, just manually advancing through the stages in order, revealing the parts.
I also prototyped a kit building scenario with a simple Lua script to allow the player to advance through a blueprint construction’s stages, automatically spawning the parts they need to build that stage. This idea has potential I think, but will need work to make it more user friendly.
Minor demo update
I decided to release another quick demo update, out now with some fixes and other small tweaks:-
Minor UI improvements, including a new “getting started” window that shows some helpful pointers when launching into a new game.
There are many things still to improve, but you guys have been waiting for so long, I think it’s time to finally get GearBlocks into your hands! My planned Steam early access release date is November 9th. I’m also planning on entering the Steam Next Fest from October 9th to 16th, hopefully with a special tutorial demo.
Hey everyone, quite a few fixes and improvements have accumulated since the last demo update, so I decided it was worth releasing another one.
Release notes:-
Many optimisations to UI, overlays, and indicators. Improves performance especially with a large number of parts / constructions.
Minor tweaks to builder tool:-
Click and drag “threshold” now only applies to move manipulator.
Prevented dragging the part selection’s pivot point below ground.
Increased targeting distance.
Removed “Prevent Interpenetration When Attaching Parts” toggle from “advanced options” (still available in the demo by setting “PartPenetrationTestEnabled” to false in the debug console).
Added toggle to “advanced options” to disable the centre of mass indicator.
Modified control wheel part behaviour to check for player distance and facing direction.
Added option to light part behaviour settings for disabling shadow casting.
Implemented copy paste for part behaviour settings.
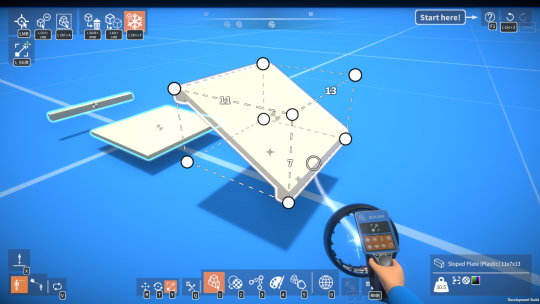
Improved part resizing indicator to show numbered unit dimensions.
Gear engagement indicators now shown for all gears in part selection when aligning.
Added settings to controls options to invert horizontal and / or vertical mouse rotation of the part selection.
Hey all, I’ve made a fair amount of progress on the game over the past month, so let’s get into what I’ve been up to.
“Gary Island” map
One conundrum I had while designing the tutorial scenario was where to locate it (i.e. which map to use and whereabouts on that map). I could have used one of the existing maps but they are all pretty large and “open plan”, which made it hard to lay out the scene for the tutorial. I needed something small with clear boundaries that spatially confine the player.
For a while I had been resistant to the idea of adding another map for the tutorial scenario, but it became apparent that this was going to be necessary, and worthwhile investing the time and effort in. So I decided to make a new map, an island surrounded by water, with a 250×250 m playable area.
For long time followers of the game’s development, I resurrected the water from those old procedural island maps! I was also reluctant to do this actually, as introducing water brings about a whole host of implications (what happens when you go in the water? buoyancy? drag? sound & particle effects? player swimming animations?) So for now the water is beyond the map boundary and is just there for visual effect.
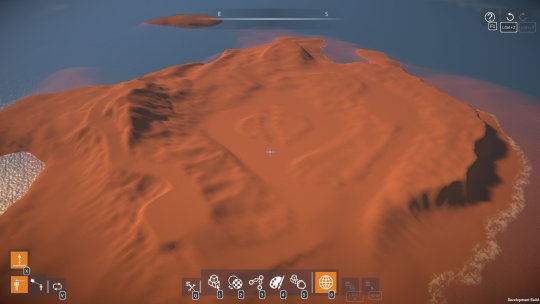
As usual, first I started with making the terrain height map:
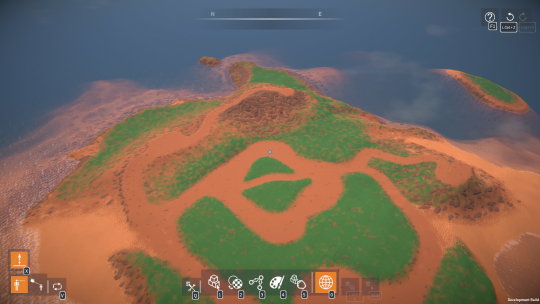
Then, painted the textures (reusing those from the other maps):
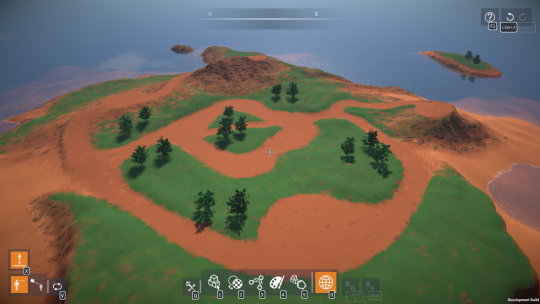
Finally, added details (e.g. grass) and trees:
Overall I’m quite pleased with how the map turned out. It has a central area (which I’ve used for the tutorial scenario), and other areas that are connected via paths for a bit of variety. I’m thinking this will be good for other scenarios, and also as a general starter map for players.
Water reflection optimisations
After bringing back the water, I needed to do some performance optimisations to the old reflection rendering implementation (water reflections are rendered using another camera with a view that is flipped upside relative to the main camera).
I improved the code by eliminating some expensive per-frame calls (GameObject.Find(), GetComponent(), etc.) and getting rid of GC allocs. I also reduced the level of detail during the reflection render (by overriding the LOD bias, turning off terrain details, and reducing the tree LOD switch distance).
Finally, I added a “video options” setting to make the water reflection rendering only include the terrain & sky, or be turned off altogether (falling back to a reflection probe).
Tutorial scenario
To finish the final iteration of the tutorial scenario, first I had to create a scene in the new map. I laid out all the constructions, checkpoints, and so on for each of the tutorial stages that the player completes in sequence.
Then I worked on the scenario scripting, organising the Lua scripts by breaking them up into the tutorial stages. The scripts are responsible for tracking player progress through the tasks they have to complete for each stage, showing a UI window with instructions (text and videos), and helping the player get back on track if they make a mistake. This turned out to be a huge amount of work, but I think the results turned out really well.
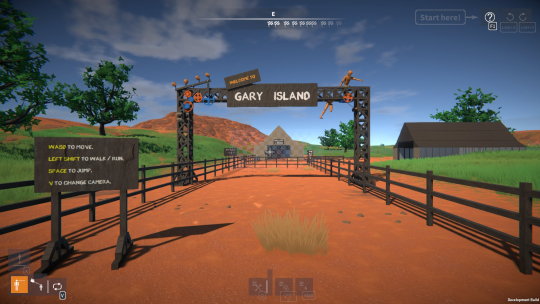
Here’s a sneak peak of the start of the tutorial scenario:
So the tutorial scenario is now (more or less) complete, which is a huge milestone, as that was the last major task before early access release. There’s still a bunch of work to do, but I’m now in a position to prepare the game for release which is very exciting!
Part resizing indicator
I’ve implemented another indicator that shows unit dimension numbers near a part when resizing it with the resize manipulator.
This makes it much easier to see the part dimensions while resizing, as it saves having to look down at the part UI overlay.
Script mods
The script mods included with the game have continued to develop. For example, I implemented a “builder tool extensions” script mod that provides an interface with options for precise part placement.
I also improved and added to the various debug tools, and added a simple “hello world” example. I can’t wait to see what script mods of their own players can come up with!