Over the past few weeks I’ve been finishing up the player character work I started a while back, along with some code refactoring and other things.
Building a player character
I’ve now implemented functionality so that a construction built out of body parts can be treated as a player character model. Such a “character construction” differs from a normal construction as follows:-
It doesn’t get serialized out to saved games, because the player’s character construction gets spawned separately (based on what was selected in the character screen, see below).
It doesn’t collide with other non-character constructions or objects in the world (the player’s CharacterController takes care of collisions).
It can’t be selected, frozen, or destroyed.
Body parts in it don’t move via physics, instead they are locked to the appropriate animated bone (e.g. head, upper arm, lower leg, etc.)
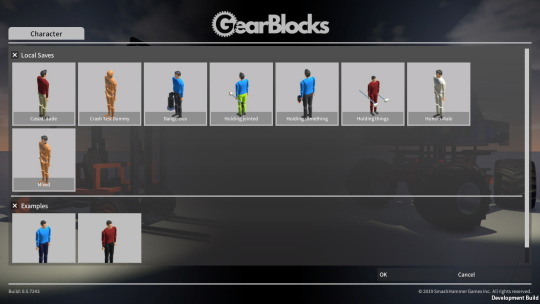
I added a new character screen accessible from the main menu. This allows the user to select a character construction, which will then be spawned as the player character when entering a game.
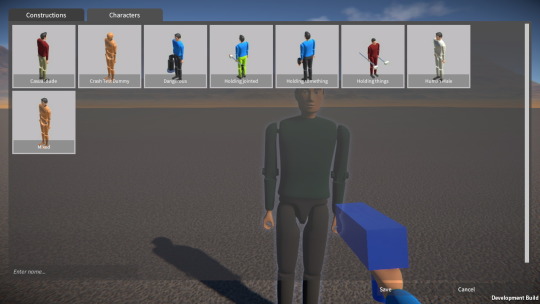
To create a custom character, first the user assembles a construction as normal out of body parts, and then they save it via the save construction screen. As shown below, I added a tab to this screen to allow a construction to be saved as a character so that it’ll then appear in the character screen and be available for selection.
To switch to the new character, the user then has to exit back to the main menu, go into the character screen and select the one they just saved, before re-entering a game.
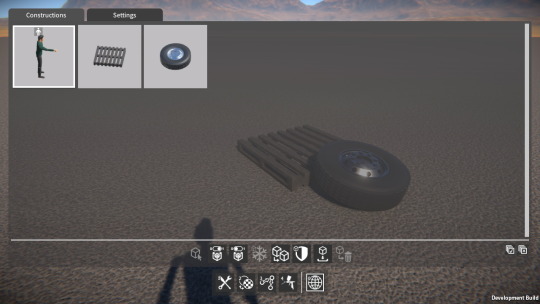
In game, the character construction can be seen in the world tool UI just like any other construction. However there are some operations that can’t be performed on it as mentioned before: select, freeze, or destroy. This can be seen below, note that the character construction has an icon to identify it as such.
This pretty much completes the player character system although, as always, there are a few loose ends to tie up:-
I need to add checks to ensure that the construction is valid to be a character (e.g. has the correct body parts, and they are connected together appropriately).
Currently, to change the player character construction the user has to exit back to the main menu, I’d like to implement a way to swap it during game play.
The body part meshes need a bit more modelling work.
I’d like to add more attachment points to the body parts to allow for more customisation options.
I also want to add more body part variants and accessories.
Free flight mode
I’ve also finished working on a “free flight” mode for the player. This turns off gravity for the player and changes the controls slightly so that the user can fly up and hover in the air, handy for when building large constructions!
Singleton squashing
Finally, I also did another code refactoring pass to eliminate the remaining singleton MonoBehaviours in the game (well nearly). This primarily involved converting them to ScriptableObject assets, and replacing any public method calls with events and handlers. I covered this topic in the ScriptableObjects For Fun and Profit blog post a while back, so I won’t go into detail here. Suffice to say I’m done with this refactoring process now, there are only a couple of singleton MonoBehaviours left, which are for my networking abstraction layer (something I also blogged about a while ago), and I think I’m just gonna leave these as they are.
Well, seems like another two months has gone by in a flash! I was away visiting family for some of this time, and the work I’ve been doing on the game has resulted in a frustrating lack of progress to show for it, but here’s an update on what I’ve been up to anyway.
Saved game serialization
Up until now, saved games and constructions have been serialized via a binary stream, with no formatting, just using BinaryReader and BinaryWriter directly. This is fast and results in a compact file size, but has one huge disadvantage, a lack of version tolerance. In other words, if I add or remove any variables to be saved, or reorder them, then old saved game files will no longer load correctly. To work around this I wrote code to check a version number in the saved file, and then convert things over for each added or removed variable. This is a hack really, and has resulted in rather messy and hard to maintain code.
This situation is bad enough with just the demo version of the game out there, with a cut down feature set. Maintaining saved game backwards compatibility will only get harder once the full version is released.
Ideally, I need a properly structured save file format, with some kind of key value pairing that would allow for version tolerance, but wouldn’t bloat the file size too much.
BinaryFormatter
First I investigated using BinaryFormatter, because it allows for version tolerance via optional fields, but I couldn’t get it to work when deserializing MonoBehaviour classes. I need to be able to instantiate the MonoBehaviour and then populate serialized values into it, not have the deserialization process itself try and allocate a new MonoBehaviour (which is not allowed by Unity). I thought maybe using a serialization surrogate might allow for this, but couldn’t figure out a way to make it work. The other downside of BinaryFormatter is all the assembly and type data it saves out adds quite a bit to the file size.
Json serialization
So after looking around for other possible solutions, I decided to try Json. This provides the key value pairs I need in a fairly compact structured format. I used Json.NET from Newtonsoft (provided via a Unity asset store package for ease of integration) which seemed really promising, it’s very easy to use and highly configurable. In most cases there’s very little additional code to write, you can just use the JsonProperty attribute to specify which class properties to serialize, and configure how they’re serialized. Also, it allows for populating properties of a MonoBehaviour that has already been allocated, by using JsonSerializer.Populate() inside a JsonConverter.
Still, it took me several weeks to get Json serialization working for both saved constructions and full saved games, there were a few stumbling blocks along the way which took time to work around, as did just learning how to best use the Json.NET API. The end result seemed great though, it solved the version tolerance problem, and the code was so much simpler and cleaner.
One issue was that the resulting file sizes of the text based Json format were huge. Given that the game uses the same serialization code path to send construction data between networked players, this was a problem. So, I switched over to using Bson (the binary equivalent to Json), and also compressed the data via a DeflateStream. This worked well, the resulting file sizes actually ending up smaller than my original binary stream format.
Performance and memory problems
At this point I thought I was good to go, but then I started profiling the Json serialization with large saved game files (more than a thousand parts), and realized I was in trouble. Firstly, deserializing the saved game was more than twice as slow using Json vs. the old binary stream method. This wasn’t a complete disaster as the load times weren’t terribly long in the first place. The other more serious issue was that the Json deserialization did an enormous number of tiny GC allocations (as in millions of allocs, totalling hundreds of MB!).
I found that reducing the JsonProperty name lengths helped slightly with this but not to any significant degree. I spent quite a lot of time restructuring the code that loads the various modules in the game (player, constructions, time of day, etc.) to try and deserialize from the file stream more efficiently, but this made very little difference to performance or memory usage unfortunately (the resulting code was cleaner than before though so I guess the refactoring was worth doing anyway).
I’m annoyed with myself that I didn’t do enough tests to pick up on these problems before putting all the effort in to convert the game over to use Json. If I’d known ahead of time, I probably wouldn’t have bothered.
So now I’m not sure what to do. If I stick with the old binary stream solution, then all the Json serialization effort will have been wasted and I’m still stuck with difficult to maintain code for backwards compatibility. But the Json serialization option as it stands isn’t acceptable, I’d need to do something to resolve the memory and performance issues. One possibility would be to manually serialize everything (i.e. use JsonReader / JsonWriter directly rather than JsonSerializer), supposedly this is the fastest way as it avoids overhead from reflection and so on.
I’ve decided for now to put all this to one side, think about it some more, and come back to it later. In the meantime I really need to get back to trying to make some positive progress with the rest of the game!
I’ve been wiped out with a nasty bug over the last couple of weeks which slowed productivity somewhat, still got quite a few things done though!
Text decals
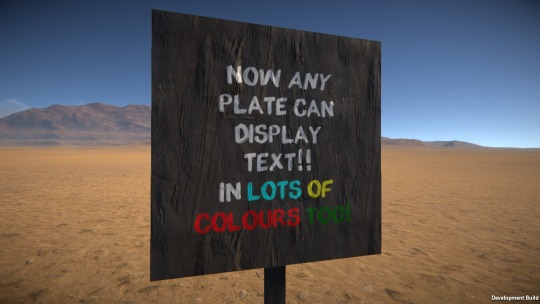
I implemented a decal shader that can modify material properties in the g-buffer independently of normals. This allows for rendering over the top of objects already rendered in the scene, modifying albedo, smoothness, etc. while leaving the underlying normals as they are, which gives a “painted over” look. I wrote this shader specifically to work with rendering font text from the Unity UI.
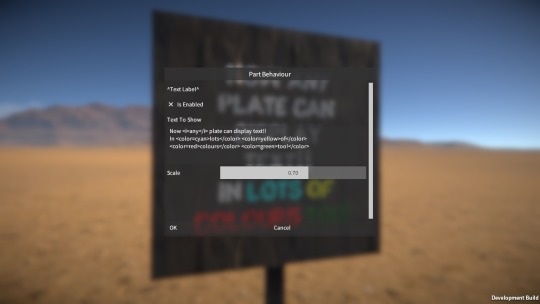
Then, I added a Canvas in World Space mode and a UI Text component to the resizable plate part, and implemented a new text label part behaviour to configure the text string to be shown.
With a “painterly” font, it’s quite a nice effect, here’s an example of what it looks like:-
And here’s the part behaviour UI the player can use to configure the text string:-
This will be handy for labelling things on constructions, and I’m thinking I might make use of it in future challenge game mode scenarios / tutorials.
Data links
I refactored the part behaviour linking code using various interfaces to better decouple the code and make it easier to add new link types. I also made some minor fixes and improvements to the linker tool.
I then implemented a new data link type, which allows part behaviours to expose “data channels” that can be accessed by other linked part behaviours. Where appropriate, I added data channels to all the part behaviours already in the game, for example the electric motor now exposes its current RPM, torque, and power values.
Electronics
Now the dawn of a whole new category of parts, electronics! I hope to expand on this a lot more in the future but here’s what I’ve done so far.
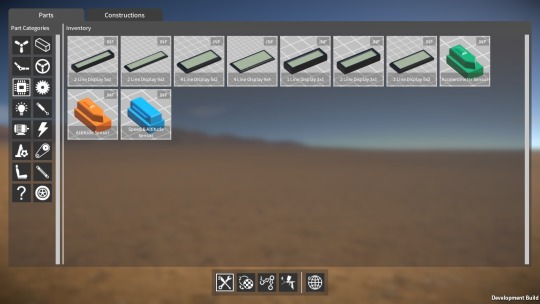
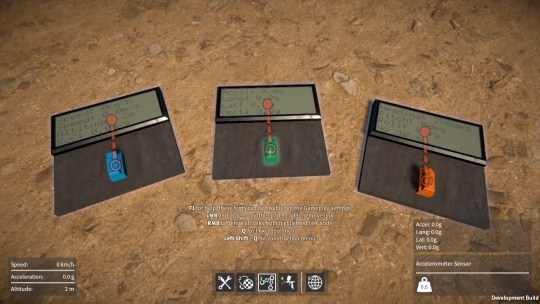
Putting the text decal shader and the data links together, along with a LCD display font, I implemented some text display screen parts that show the data channels of the part they’re linked to.
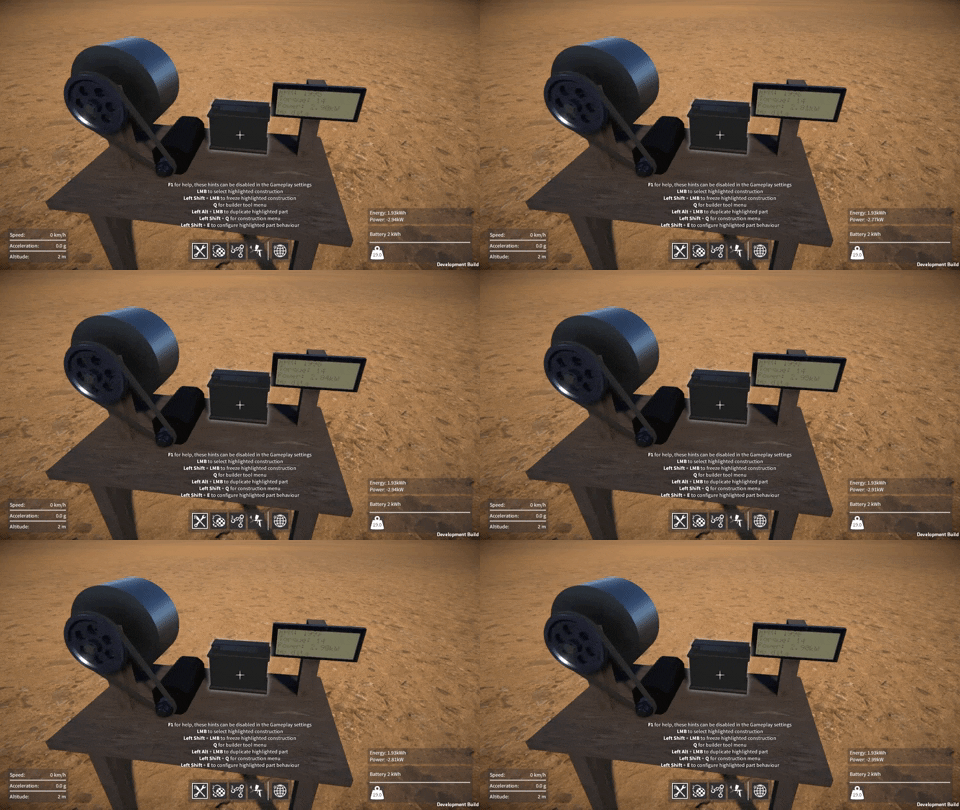
Here you can see the new data link type being used as we link a display to a motor:-
The display screen showing the motor’s data channel values while it runs:-
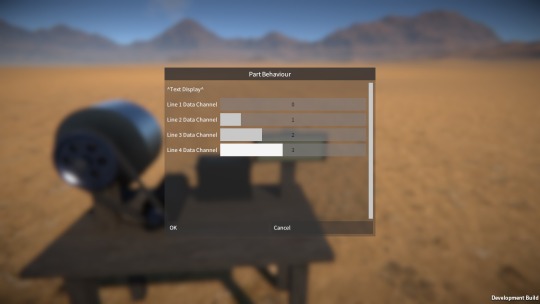
These displays have a part behaviour that lets the player assign a data channel to each text line on the display. Here’s the UI for this, it needs some improvement but is functional for now at least:-
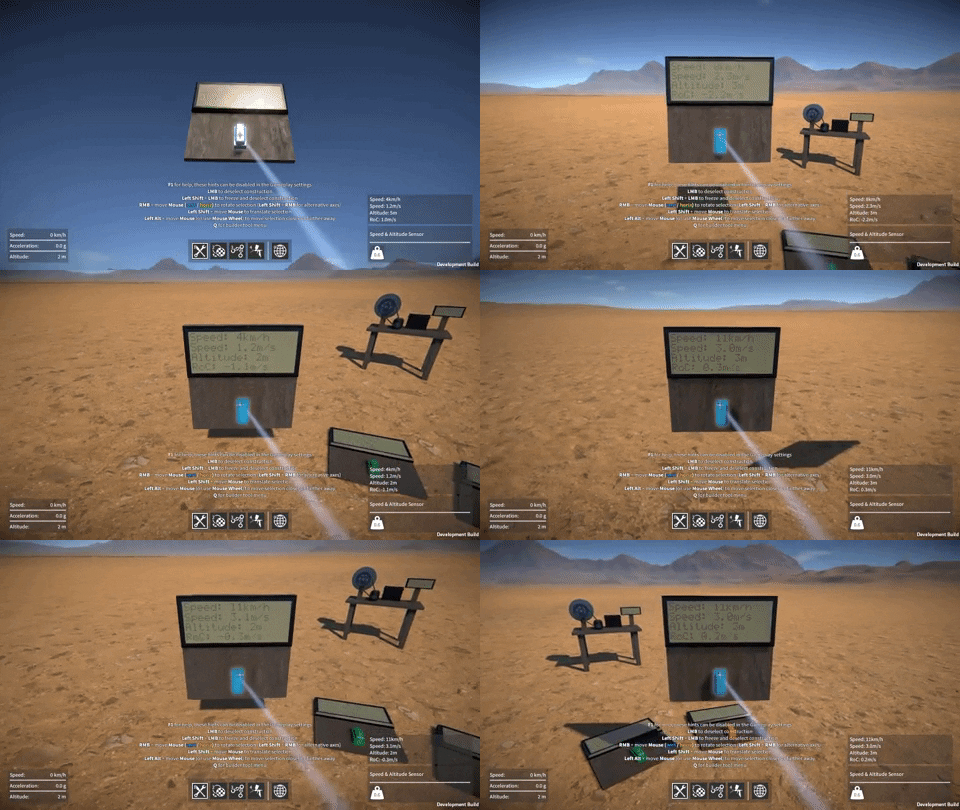
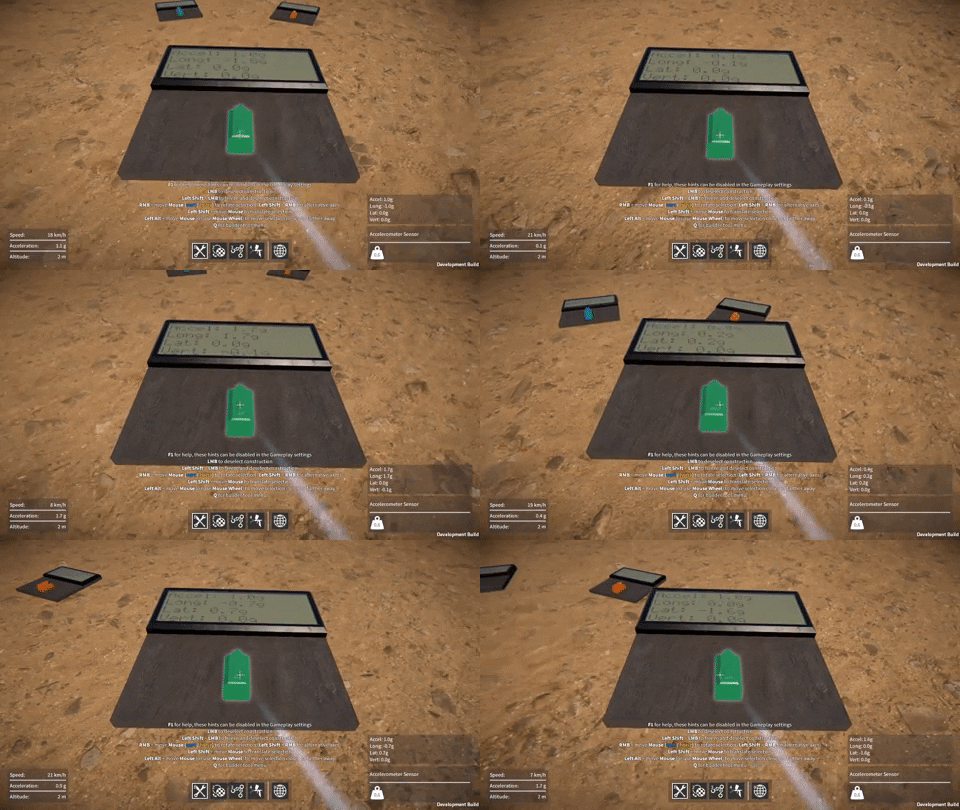
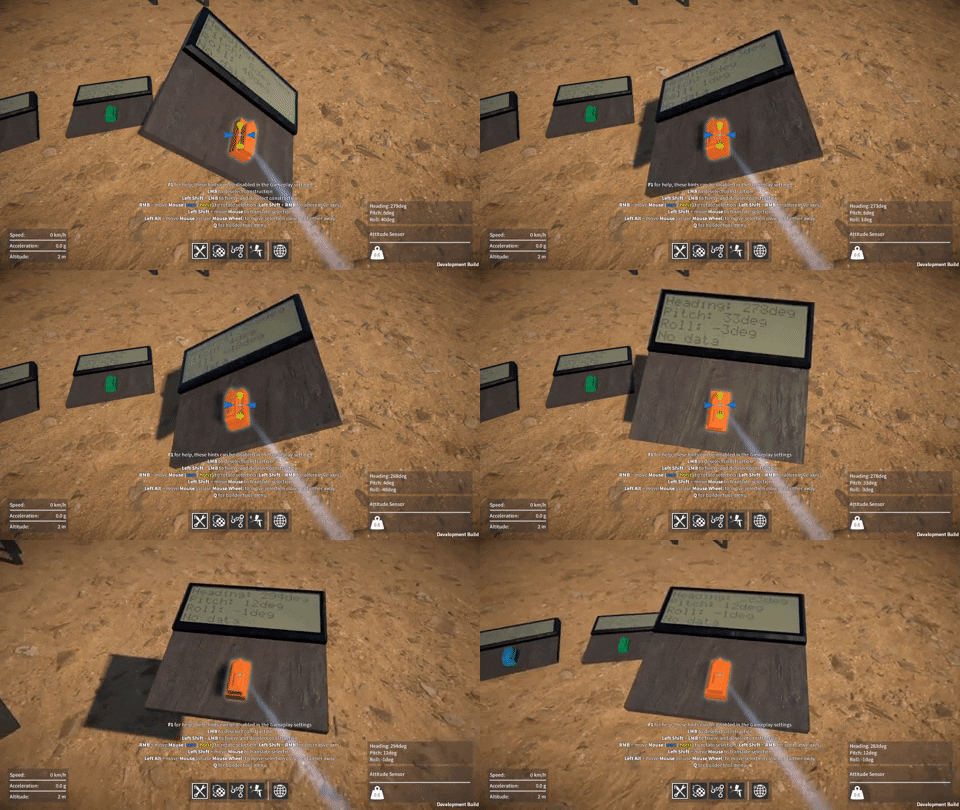
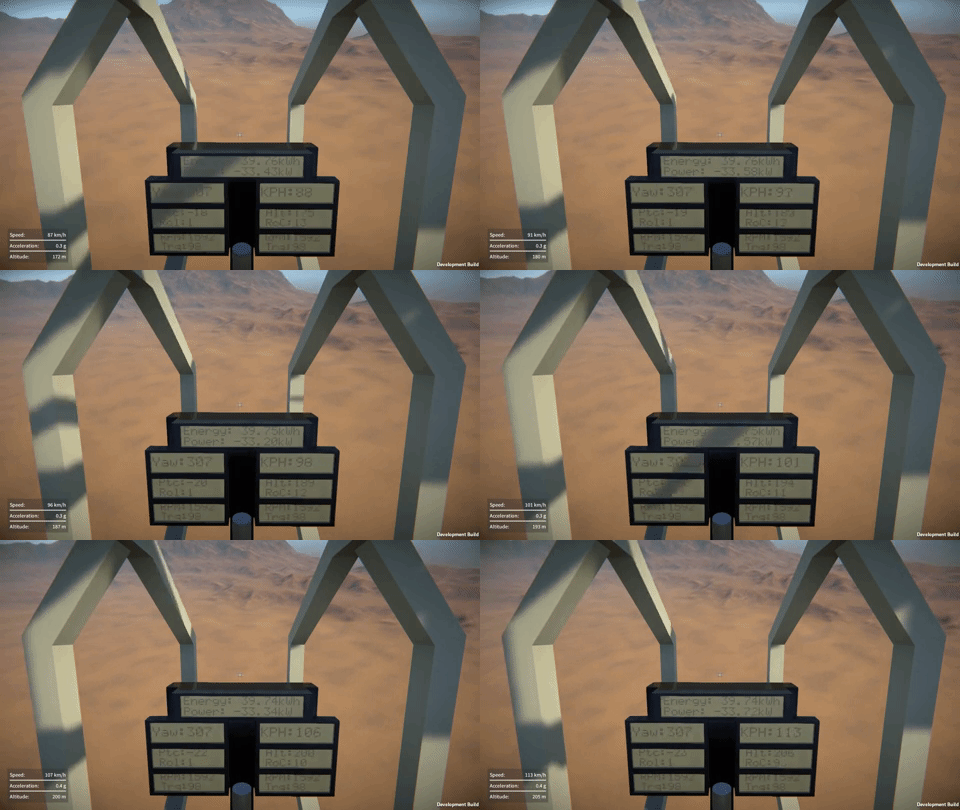
I also added some “sensor” parts which are little modules that calculate their own speed, acceleration, or attitude (i.e. orientation in the world) and report these values via data channels. These can then be linked to from the LCD displays to show their current values.
The speed sensor in action, as well as speed it also reports its altitude and rate of climb (RoC):-
The accelerometer sensor, reporting longitudinal, lateral, and vertical acceleration separately, as well as overall acceleration:-
Finally, the attitude sensor, which reports heading, pitch, and roll in degrees:-
I have loads of ideas for more sensor modules I could add in the future, e.g. for reporting angle, angular velocity, proximity (think radar / lidar) and so on. Let me know if you have any ideas too! Combining these with the control links I have planned will really open things up to some very cool possibilities I think.
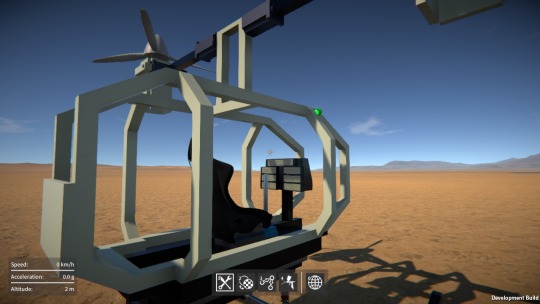
Anyway, for now I’ve just been enjoying messing playing around with these parts, like adding some sensors and LCD screens to the Mosquito flyer for flight instruments!
Most of my time over the past few weeks has been spent on a major reworking of the code for all of the tools in the game (builder, material, painter, etc.) in order to improve the building experience for networked client players in multi-player games.
Previously the tool code that responded to player inputs in order to perform various actions (such as attaching a part, breaking an attachment, applying paint, and so on) would always run on the server for all players, with each client simply sending their inputs to the server for it to deal with. This setup made it relatively easy for the server to handle things like arbitration between players, seeing as they were effectively all running locally as far it was concerned.
However this approach was flawed, the most significant problem being the latency between client player input and an action happening, which made building really awkward to say the least.
So I’ve now re-implemented every tool so that player input is processed locally on each client. In some cases the client must still request the server to complete certain actions, so that the server can validate and arbitrate where needed (for example, while one player is attaching one part to a second one, at the same time another player could be deleting that second part; the server needs to have the final say on the outcome in this scenario). In many situations however, it is not necessary for the client to check with the server first (e.g. moving or resizing a selected part, painting a part, etc.), instead the client just informs the server of the change made so that it can be broadcast out to the rest of the clients.
The result is that the building experience for networked clients is now basically the same as it is in single player games. The other benefit of these changes is that because input is processed locally for each player, it simplifies the code and makes it a bit easier to modify and improve the tools.
Builder tool tweaks
On which subject, I’ve made a couple of minor improvements to the builder tool thanks to some suggestions I’ve received.
Remove actions (delete part, destroy construction, etc.) are now delayed, during which time the action key has to be held down. This should hopefully prevent annoying accidental deletions from mis-clicks!
I changed the default key binding for duplication from “Q” to “Left Alt + LMB”, by default “Q” is now dedicated just to opening the tool menu.
The usability of the builder tool controls is still an ongoing concern, and something I’ll have to keep plugging away at over time, but at least now it’ll be easier to implement any further improvements I need to make.
New demo coming soon
Finally, I’m getting close to releasing another demo build, and I’ve been fixing a bunch of bugs in preparation for this. There have been a ton of changes to the code since the last demo, so I’m slightly paranoid that some as yet undiscovered bugs might have been introduced. Time to do some more testing I think, hopefully I don’t encounter any last minute issues!
Posted on
Here’s a quick demo of the new material tool, showing how the tool is used, and how the different materials affect both visuals and physics.
Well, it’s been a while, so time for a progress update I think! The material tool is now done, and I’ll show it in action very soon, so watch out for that. Most of my time however has been occupied with a massive code re-architecture effort, and that’s what I’m going to go over in this update.
From a high level perspective the GearBlocks game code is quite well laid out in terms of separating various subsystems (e.g audio, graphics, player, UI, etc.) via namespaces and so on. However, there was still a lot of code coupling (i.e. direct dependencies) between areas of the game code that should really be completely independent. This made it impossible to reuse or test parts of the code independently, and it was only going to get worse as development progressed.
ScriptableObjects to the Rescue
I’d been using ScriptableObjects in Unity for a long time, but only in a select few cases as data containers, I certainly hadn’t been using them to their full potential.
I watched these two excellent presentations a while back:-
Ever since, I’d been wanting to adapt the ideas presented in these talks to the game to improve the code architecture, and so I finally decided to take the plunge. This was a huge endeavour, but well worth it I think.
ScriptableObject Events
Previously I was using Unity’s ExecuteEvents system as the basis for events in the game. This was helpful for code decoupling, however it still had some disadvantages:-
In order to add a new event, a new interface has to be written (derived from IEventSystemHandler), and then implemented in all the MonoBehaviours that need to receive the event.
It’s necessary to explicitly call ExecuteEvents.Execute() on every GameObject with MonoBehaviours that need to receive the event. To me, this makes ExecuteEvents more like messages than true events, but perhaps that’s just semantics.
Only MonoBehaviours on GameObjects can receive these events, ScriptableObjects can not.
So I replaced these with a new system, where each event is now a ScriptableObject asset. Here’s a simplified version of the code:-
public class EventAsset : ScriptableObject
{
    public delegate void EventHandler();
    public event EventHandler Handler = null;

    public void Raise()
    {
        if( Handler != null )
        {
            Handler();
        }
    }
}
The real implementation is slightly more complex, but follows the same principle. It’s implemented using C# generics to allow for different event argument types, and has support for logging and listing the current event subscribers. This is used by a custom editor I wrote to display this info while the game is running in the Unity editor, here’s an example of it in action:-
To use an event it can simply be assigned to a variable in the Unity inspector, then to receive it, just subscribe to Handler:-
public class Receiver : MonoBehaviour
{
    [SerializeField] EventAsset somethingHappened;

    EventAsset.EventHandler onSomethingHappened;

    void OnEnable()
    {
        onSomethingHappened = () => { Debug.Log( "I hear that something happened!" ); };
        somethingHappened.Handler += onSomethingHappened;
    }

    void OnDisable()
    {
        somethingHappened.Handler -= onSomethingHappened;
    }
}
Or to raise the event, just call Raise() on the event:-
This setup has some useful advantages over the old ExecuteEvents system:-
No need to write any code to add a new event, just create a new event asset and assigned it in the inspector where needed.
No need to explicitly refer to specific GameObjects to send the event.
Don’t even need to be using GameObjects, these events can be used by ScriptableObjects as well as MonoBehaviours.
The events are more easily debuggable via the custom editor.
ScriptableObject Variables
Events aren’t always the most appropriate pattern for sharing data between subsystems, for example sometimes it’s necessary to store a value somewhere and allow it to be read a later point, perhaps continuously polling it to watch as it changes.
Previously I was doing this by having my subsystems be singletons, and then directly reading / writing properties in them where needed, thereby tightly coupling different areas of the code together, not good! To solve this I made a new “variable” system, where each variable is a ScriptableObject asset. Whereas events can be thought of as radio broadcasts, the variable system is conceptually more like a noticeboard (with each variable being a notice pinned to the board).
Here’s a simplified version of the code, it’s implemented as a generic class to allow for different variable types:-
public abstract class VariableAssetBase<T> : ScriptableObject
{
    [SerializeField] T value;

    public T Value { set { this.value = value; } }

    public static implicit operator T( VariableAssetBase<T> variableAsset )
    {
        return variableAsset.value;
    }
}
For example, a bool variable type:-
public class BoolVariableAsset : VariableAssetBase<bool>
{
}
Again, the real code has a bit more going on. It has an event delegate that code can subscribe to, in order to be notified when the variable value is assigned to (this saves having to use a separate event for this). It also has support for serialisation so that I can use these variables for things like game settings (e.g. controls, gameplay, video) and allow the player to save / load them. Plus I made a custom editor that allows variable values to be viewed or even modified while the game is running in the Unity editor. At some point I might implement a debug console that would allow this to be done even in standalone builds, which would be super cool!
To use a variable it can be assigned in the inspector, then written to / read from. Notice that Assigner and Watcher in this example are completely independent of one another:-
public class Assigner : MonoBehaviour
{
    [SerializeField] BoolVariableAsset isThingTrueVar;

    void ThingBecomesTrue()
    {
        isThingTrueVar.Value = true;
    }
}

public class Watcher : MonoBehaviour
{
    [SerializeField] BoolVariableAsset isThingTrueVar;

    void Update()
    {
        PollThingTruthiness();
    }

    void PollThingTruthiness()
    {
        Debug.Log( "Thing is currently " + isThingTrueVar );
    }
}
I replaced data in my subsystems that needed to be shared with these new ScriptableObject variables. This allowed me to remove a lot of code dependencies, and eliminate the need for singleton references in most cases.
One example being the UI overlay that displays the player’s speed, acceleration, and altitude. It now just reads variables for these values and displays them, completely independently of the player code that updates them.
ScriptableObject Dictionaries
There’s one slight wrinkle with the ScriptableObject variable system, in that there is only one global instance of each variable. For example, sometimes I need one instance of a variable per player (in multi-player games). To solve this I implemented a simple ScriptableObject dictionary, here’s the implementation pretty much in full:-
public abstract class DictionaryAssetBase<TKey, TValue> : ScriptableObject
{
    Dictionary<TKey, TValue> dictionary = null;

    void OnDisable()
    {
        if( dictionary != null )
        {
            dictionary.Clear();
        }
    }

    public TValue this[TKey key]
    {
        get
        {
            if( dictionary != null )
            {
                TValue value;
                if( dictionary.TryGetValue( key, out value ) )
                {
                    return value;
                }
            }

            return default(TValue);
        }

        set
        {
            if( dictionary == null )
            {
                dictionary = new Dictionary<TKey, TValue>();
            }

            dictionary[key] = value;
        }
    }
}
Then for example, a dictionary with byte keys and bool values:-
public class ByteBoolDictionaryAsset : DictionaryAssetBase<byte, bool>
{
}
The only part I left out here is some code for listing the entries currently in the dictionary, used by another custom editor I added for debugging while the game is running in the Unity editor.
A dictionary is used in much the same way as a ScriptableObject variable:-
public class Assigner : MonoBehaviour
{
    [SerializeField] byte thisPlayersID;
    [SerializeField] ByteBoolDictionaryAsset isThingAboutPlayerTrueVar;

    void PlayerThingBecomesTrue()
    {
        isThingAboutPlayerTrueVar[thisPlayersID] = true;
    }
}

public class Watcher : MonoBehaviour
{
    [SerializeField] byte thisPlayersID;
    [SerializeField] ByteBoolDictionaryAsset isThingAboutPlayerTrueVar;

    void Update()
    {
        PollPlayerThingTruthiness();
    }

    void PollPlayerThingTruthiness()
    {
        Debug.Log( "Thing is currently " + isThingAboutPlayerTrueVar[thisPlayersID] + ", about player with ID: " + thisPlayersID );
    }
}
Replacing Singletons
The game has many self contained code modules providing utilities and functionality used by other parts of the code. Previously these were either static classes or singleton MonoBehaviours, both having their disadvantages:-
Static classes can’t have variables serialized by Unity or edited in the inspector.
Singleton MonoBehaviours need to live on a GameObject somewhere in the scene (or at least in a prefab).
So now I’ve re-implemented most of these as ScriptableObjects which have neither of these downsides. They work well with the new ScriptableObject events too, these modules being able subscribe to or raise events, which helps with code decoupling.
Other Uses of ScriptableObjects
I found many more places to use ScriptableObjects, far too many to go over in detail now, but here’s a brief summary of a few of them:-
Added ScriptableObject “delegate objects”, making use of the strategy pattern where different variations on a theme implement a common interface. For example I use this for the procedural generation code for the various different re-sizable parts in the game.
Replaced some enums with ScriptableObject assets.
Implemented ScriptableObject data assets with built in functionality for better separation of concerns. For example, I implemented a “sound asset” ScriptableObject that handles random AudioClip selection and playback, and then created a whole bunch of these assets for all the sounds in the game.
Hey all, hope everyone has had a good holiday break. I thought I’d give a quick update on what I’ve been working on over the past few weeks.
Toolbox code refactoring
Up until now, the code for the various tools (builder, linker, painter, etc.) was pretty much all in one (very large) source file. This was driving me crazy as made it a real pain to to fix bugs, or add new features. So I finally took some time to do something I’d been wanting to do for ages, which was to refactor this monolithic beast into separate source files for each tool.
There are still things I’d like to improve and clean up (further code decoupling, mainly), but it’s much better than it was, and makes it easier to add new tools, on which subject…
Material swapper tool
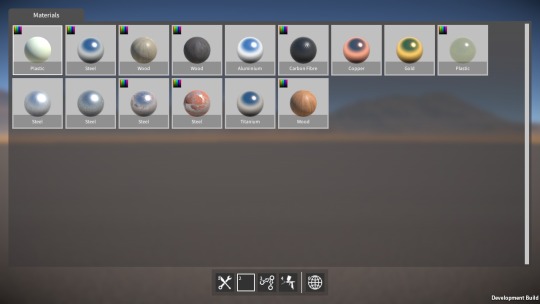
After the refactoring, I started work on a new tool that allows you to swap the material on certain parts (such as beams and plates) after they’ve been spawned, and even after they’re already part of a construction.
The first step was to add a material definition that encapsulates all the various part material properties (i.e. the rendering & physics materials, density, strength, and “is it paintable”). Next I had to refactor the part descriptor code to allow parts to use this new material definition (seems like I’ve been doing a lot of code refactoring lately!)
Then on to the material tool itself, which I’m still in the middle of building. Right now I have a first pass implementation working, with the basic UI done, and the ability to change material on the highlighted part. There’s still more to do however; for example, save / load (including converting old save files to the new material swappable parts), and probably more refactoring as I’m not quite happy with how the part descriptor code is structured just yet.
Anyway, it shouldn’t take too much longer to finish up, once it’s done I’ll reveal more about how it works. After that I’ll probably get back to finishing up the linker tool, as that’s been on the back burner for way too long now.
In the meantime, I’d like to say a big thank you for following my progress, particularly to those of you that have been following for a long time, and who continue to play the demo and give me feedback. I know development of the game is frustratingly slow, but I will get it done eventually, I hope!
Happy New Year, and all the best for 2019.
Posted on
Damage is done
Well, it took me long enough, but finally the damage system is complete! Most of the time was actually spent doing optimisation work, which I’ve discussed before in previous posts, the damage system itself didn’t take that long to do.
On the idea scrapheap
My original idea for damage was that each attachment between parts (fixed, rotary, linear, etc.) would have a “health” value. Then upon a collision contact with a part, some damage amount would be propagated out to all of that part’s attachments. For each attachment, damage would effectively accumulate over time as its health value gradually reduced, until it reached zero at which point the attachment would be deleted.
However, there were problems with this method:-
Deleting individual attachments due to damage would lead to inter-penetration issues, just like when you manually delete attachments with the builder tool.
Each attachment having a health value would need to be conveyed somehow to the player via a UI, and I couldn’t think of a way which wouldn’t be messy and confusing.
Because damage is applied for every collision contact (of which there can be many), the code is quite performance sensitive, and so needs to be as lightweight and simple as possible, which this method wasn’t.
Binary break
So in the end I went with a simpler solution that just uses a “strength” threshold. When a part receives a collision contact, I simply compare the impact force with the part’s strength value, and if the force is greater than this value, I break the part off (i.e. delete all of its attachments), otherwise I leave it attached. In other words, a part is either entirely broken off or it isn’t, there’s no intermediate damage state or health values to deal with.
Happily, I found was that there was not really any need to explicitly propagate the damage force to neighbouring parts to achieve a convincing effect. Direct impacts seem to be enough, I think because as parts break off they hit other parts and the damage sort of propagates organically.
I’ve also finished the implementation of explosives that integrates with the same damage system, in this case the damage force is simply derived from a linear fall off from the explosion centre. The resultant bits that are broken off then have an explosion force applied to them to push them around, seems to work pretty well.
Lastly, I’ve also added a per-construction setting to enable / disable invulnerability (i.e. immunity from part breakage), as sometimes it could be useful to disable damage for those particularly “experimental” constructions that might try and smash themselves to bits.
Still to do
As I mentioned, each part has a strength value which basically determines how hard it is to break off. A part’s strength value is intended to reflect the material it’s made from (e.g. steel is stronger than wood or plastic), and I still need to fine tune these strength values to get the balance correct and hopefully give a nice trade off between the various materials.
Also, I’m thinking I might bias each part’s strength value slightly based on the number of attachments it has, so that the more other parts it’s attached to, the harder it is to break off. Again, hopefully giving the player further interesting trade offs to choose between when building their constructions.
OK, it seems I spoke too soon when I said in the last blog post that I was done with optimisations to the construction modification code! When working on the damage system, I found that detaching parts off large constructions with lots of parts could still be really slow, so over the last few weeks I’ve been working to resolve this.
Setting transform parents
When modifying a construction (i.e. attaching or detaching parts), I need to change transform parents in order to manipulate the construction’s transform hierarchy, and by far the biggest performance cost I found was with this re-parenting. Even when setting worldPositionStays to false when calling SetParent() so that Unity doesn’t have to recalculate world transforms, it’s still really slow when you call SetParent() a lot, due to Unity internally updating the physics colliders. When modifying a large construction, in the profiler I was seeing Physics.HandleColliderHierarchyChanges and Physics.SyncColliderTransform costing many tens, sometimes hundreds of ms!
So now I’ve done everything I can to get rid of unnecessary re-parenting, thereby minimising the number of SetParent() calls, specifically:-
When fixedly attaching parts together, all the parts have to be re-parented from their current rigidbodies to a single rigidbody. Now, parts from the rigidbody with the smaller number of parts always get re-parented to the rigidbody with the larger number (without re-parenting the larger number of parts).
Similarly, when deleting fixed attachments, parts need to be re-parented to separate rigidbodies. Now, after determining the groupings of parts left after attachment deletion, the largest group always stays under their original rigidbody, and the rest get re-parented to other new rigidbodies.
Lastly; I was parenting rigidbodies that were part of the same construction to a container gameobject, this was handy for clarity and debugging purposes, but not strictly necessary. I changed the code to maintain the rigidbody-to-parent-construction relationship a different way, rather than relying on the transform hierarchy for this. After that I was able to eliminate setting of the rigidbodiestransform parents entirely.
Other optimisations
I was using List<T> to hold temporary lists of parts and rigidbodies when determining how to reorganise a construction hierarchy after deleting attachments. If there were a large number of things in these lists (e.g. parts), then calling Contains() or Remove() on them would be noticeably slow because these are O(n) operations (a linear search). So I switched over to using a HashSet<T> instead, for which these operations are O(1).
After a construction is modified, its rigidbodies bounds and mass properties (e.g. centre of mass, inertia tensor, etc.) need to be recalculated. I’ve now optimised the code that does this, mostly by caching data that doesn’t change (e.g. for parts that haven’t been re-parented to a new rigidbody).
Also after a construction is modified, a few GetComponentsInChildren() calls were being used to cache references to rigidbodies and parts. These calls were quite slow (and also caused some pretty sizable GC allocs), but after restructuring the code a bit, I was able to eliminate the need for them.
Results
All of these optimisations added together have made huge gains, at least in the test case I was using (a construction with over 2000 parts). It used to be that detaching a single part in this test could take well over 300ms(!) which caused a noticeable frame rate hitch, now it takes less than 37ms.
Around 22ms of this remaining time is taken by updating rigidbody mass properties (assigning to mass, centerOfMass, inertiaTensor, and intertiaTensorRotation), which there’s not much I can do about. I can’t understand why this would be so slow, something odd seems to be happening under the hood in Unity. Maybe this issue is fixed in Unity 2018, but for now I’m stuck on 2017.4, due to the Networking API issues I’ve discussed in previous posts. Another 12ms out of the ~37ms total is taken by Unity in Physics.UpdateBodies, which I don’t think I can do anything about either unfortunately.