Here’s part 2 of this player creation’s series, some very cool stuff in this one. The final part will uploaded very soon. Enjoy, and thanks everyone!
(Source: https://www.youtube.com/)

Here’s part 2 of this player creation’s series, some very cool stuff in this one. The final part will uploaded very soon. Enjoy, and thanks everyone!
Time for another long overdue demo release, and an update on what I’ve been working on recently!
Linker tool
After the last update where I talked about the pulleys and linker tool that I was working on, I have since completed the first pass implementation of the linker tool, and links between pulleys can now be set up by the player (rather than being hard coded).
However, the linker tool goes far beyond just pulleys and belts, my intention is that it’ll be a general way to associate various part behaviours together (e.g. batteries, switches, motors, and eventually, more advanced control systems), and this introduces the one major wrinkle I still have to figure out.
The thing is, parts can potentially have multiple behaviours associated with them, which means in theory there could be multiple links between two parts. I need to decide whether to either prevent multiple links (and in which case, how to do this in a way that makes most sense), or allow for them (in which case, how to represent them to the player via the UI, and if the player should have the ability to create links between individual part behaviours).
I also still need to add UI indicators, both to show those links already existing, and a link as it’s being added or removed (right now I’m still using debug lines).
At this point I decided to have a break and work on some other stuff instead, but I will be getting back to the linker tool very soon.
Third person camera
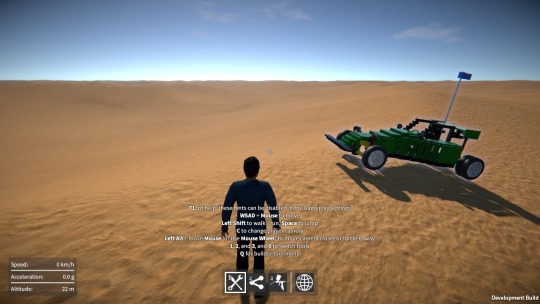
I’ve now added third person cameras to the game, both for when the player is walking around, and for when they’re seated. I debated doing this for a while actually, because I don’t currently have a proper player model, but I finally relented mainly because it’s so much fun to be able to see vehicles from the outside as you’re driving around!
The player models and animations I’m using are just placeholders that I put in ages ago for the prototype multi-player mode. Of course this now forces the issue – I now have to decide what the player character(s) should look like, as well as source the models for them, and put in better animations. Looks like I’ve just created a load of more work for myself!
Wheel physics revisited
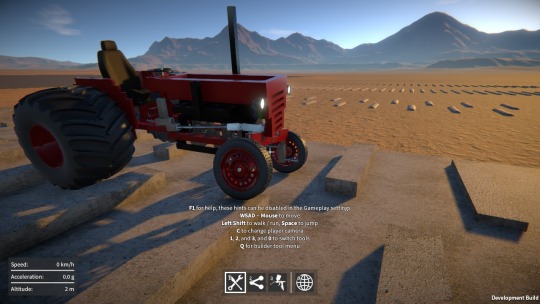
OK, this is the big one. It wasn’t supposed to be a big deal, but ended up taking several weeks to sort out! I wanted to build on the “proving ground” aspect of the desert map in the game, so I added some bumps and ramps (for testing vehicle suspension and so on). However this highlighted a significant problem with the wheel physics.
Let’s briefly recap how the wheels worked up until this point. First the wheel finds where it contacts the ground, by firing a Raycast towards it (perpendicular to its rotational axis) to find a contact position and normal. Then, it uses a ConfigurableJoint connected to the wheel’s rigidbody, that every update gets repositioned using the contact data, and has a linear limit set up to provide the collision response. If you’re interested, I did a detailed write up on this a while back: http://tmblr.co/ZzNKAt1D-zxlq
Using a Raycast to find the ground contact point
was acceptable on terrain with a smoothly changing gradient, but fails once other collision shapes besides the base terrain are introduced (such as boxes, spheres, etc.) for the wheels to roll over.
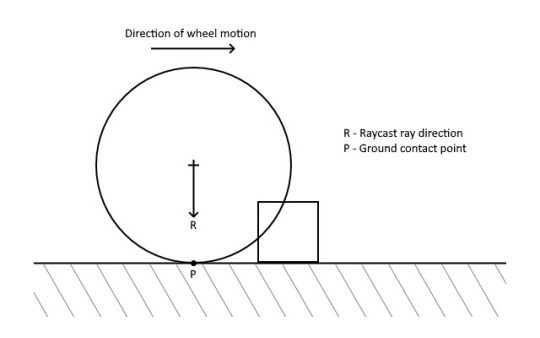
You can see here in this example that the Raycast can’t “see” the box, so the wheel inter-penetrates it. But worse, if the wheel continues to move in the direction shown, the Raycast will eventually hit the box, causing the contact point’s height to change instantaneously, pushing the wheel up with a large impulse.
So I wanted to come up with a new technique to find the contact point that would meet some important criteria:-
I experimented with many alternative ideas, including using a bunch of BoxCasts to approximate a cylindrical shape, but everything I tried failed one or more of these criteria. That is, until I eventually settled on using a single CapsuleCast in the downward direction, whose radius is the same as the wheel’s.
However this clearly has similar problems to just simply using a CapsuleCollider for the wheel. For example, if the wheel is tilted to one side relative to the ground, we get a contact point outside of the wheel, coming from one of the capsule’s “end caps”. To get around this, I effectively clamp the contact point to be within the wheel’s outer rim, as shown in the diagram below (this time viewing the wheel end on):-
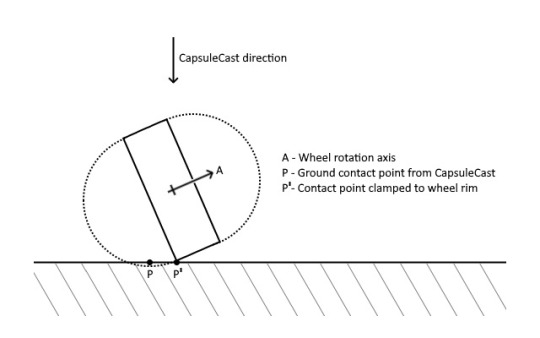
This assumes that the terrain’s gradient doesn’t change too much between the found contact point and the final clamped point!
Another problem is shown here, where the CapsuleCast would find a contact point on the box in this example, not the point on the ground that we actually want:-
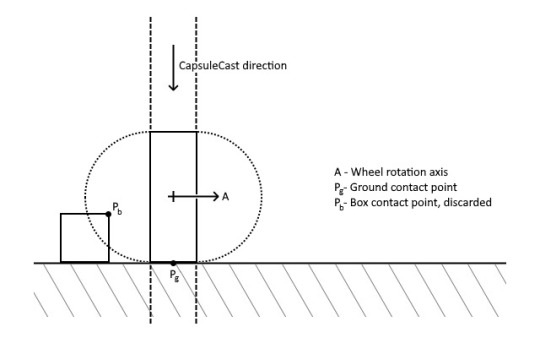
To get around this, I simply discard any contacts coming from colliders outside the planes indicated by the dashed lines in the diagram above. So in this example the box’s contact point would be discarded, and the ground contact point is used instead.
So all in all, this technique is a bit of a kludgy approximation of a true cylindrical collider, but it actually seems to work quite well. I’m pretty happy with the results!
Other stuff
I’ve also done load of code refactoring, bug fixes, UI improvements, rendering improvements (post processing effects, lighting), and other miscellaneous stuff over the past few months. Check it all out in the new demo build, have fun!
Part 1 of a series of videos demoing some of the fantastic GearBlocks community builds from last year. I meant to do this at the end of the year, but I was working on adding a third person camera to the game and I wanted to wait until that was in, as it better shows off these creations!
Parts 2 and 3 will be coming soon…
Apologies for the lack of updates lately! I’ve been working on implementing pulleys and belts in the game, and I was hoping to get them finished before posting an update. However, as always seems to be the way, they’re taking longer than I expected. They’re not quite done yet, but I have made enough progress now that it’s worth talking about where things are at.
Pulley physics
The first thing I had to figure out was how to physically constrain a pair of pulleys together such that they would transfer motion and torque correctly. My plan was to use PhysX constraints (as exposed by Unity’s ConfigurableJoint) to accomplish this, in the exact same way I do for gears.
However, pulleys differ from gears in two important respects:-
The first idea I tried was to set up a constraint whose anchor points were positioned on the edge of each of the pulleys, with motion locked along the tangent vector as shown below for two pulleys A and B:-
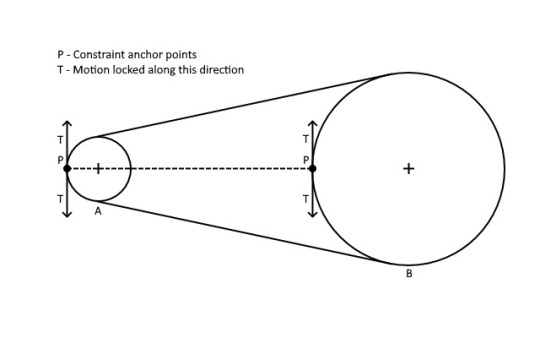
However, this didn’t work well at all because the constraint anchor points were separated by such a long distance. The pulley motion was unstable at anything other than very low RPMs.
So the next approach I tried was to instead calculate the two circles centered on each of the pulleys, whose radii are in the same proportion as the pulley’s, and whose edges touch each other. Then I placed the constraint anchors on the edge of these circles, represented by the dotted lines in the diagram below for the two pulleys A and B (again, motion is locked along the tangent vector):-
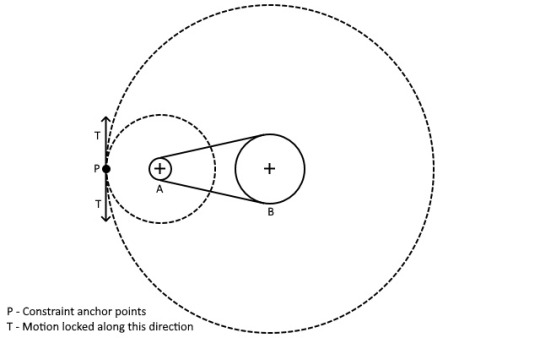
Note that these dotted circles are only used to position the constraint anchors, they aren’t visible and don’t interact with the world in any other way!
This method seems to work pretty well, it also easily allows for a cross configuration belt in a similar manner (by calculating proportioned circles whose edges instead touch in between the two pulleys, and positioning the anchor points where they touch).
Implementing pulleys in game
Actually getting the pulleys functional in the game required a lot more work beyond just the physics constraints. I wanted to allow the player to link an arbitrary number of pulleys together in whatever order they like, to form a chain that determines the route the belt takes through the pulleys.
For this I created infrastructure to associate or “link” parts together (or more specifically: link their part behaviours together). This needed to generalise beyond just pulleys, because I plan on also using it to link other parts together in the future (e.g. batteries, switches, motors, and eventually, more advanced control systems). It also needed to facilitate restrictions being applied (for example, in the case of pulleys, only allow linking if the pulleys are coplanar, and only allow each pulley to be linked to a maximum of two others).
Based on the order the pulleys are linked together, I also implemented a system to automatically calculate the belt routing (i.e. which side of each pulley the belt should go), which is then used to determine whether to use an open or cross configuration for the constraint between each pair of pulleys, as well as for positioning the visual representation of the belt.
I wanted pulleys to be able to move around slightly when the construction is unfrozen, but obviously there’s only so far a belt can plausibly stretch! So I wrote some code to deactivate the belt (both constraints and rendering) when any of the pulleys move too far from their original position, giving the appearance that the belt “broke”.
This work is complete now, and the pulleys are working in game. There are still a couple of major pieces left to do however:-
But for now, here’s an example of some pulleys linked together, the yellow debug lines showing the links, and the black ones representing the belt:-
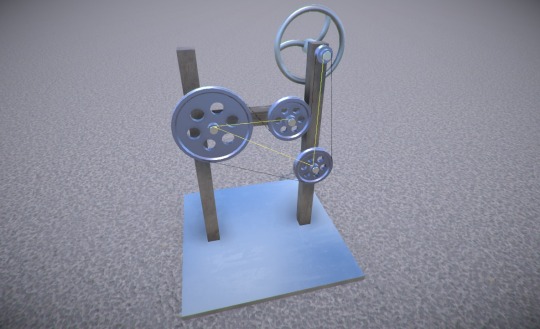
So lots left to do, but this should be really cool once it’s done, and I’m excited about the possibilities that the linker tool will allow for with other parts in the future!

It’s been a few weeks since the demo release, so it’s high time I think for an update on what I’ve been working on since then!
Rotation controls
As I’ve mentioned in the past, I’m still not entirely happy with the construction interface. One aspect of this is the way you rotate the selected part while aligning it to another part prior to attaching it. The current method of using the mouse to rotate around various axes is OK once you get used to it, but I worry that it’s a bit awkward to use, particularly for people new to the game.
So I tried prototyping a system where you use a key to cycle between the available orientations. The trouble is, there can be up to 24 possible orientations (e.g. 6 sides on a block, and 4 orientations per side, so 6 x 4 in total). I found this to be way too many to cycle between and was rather frustrating to use.
So I tried breaking it up into cycling between alignment axes (e.g. the 6 sides on a block) with one key, and cycling between the 4 possible orientations around the current alignment axis with another key. This was a bit better than using just one key, but still didn’t feel good to me. Perhaps this was because it was sometimes hard to tell which way the part had just rotated, or which way it was about to rotate on the next cycle.
I’m not sure that these ideas offer much, if any, improvement over the current mouse based method of rotating. Oh well, another failure! I guess you have to try these things, but I’m gonna leave this for now.
Game events
In order to keep the different code modules in GearBlocks decoupled from each other, I used messages (i.e. Unity’s SendMessage) to communicate between them. I wasn’t that happy with the way SendMessage uses a string lookup for the method name though – not very efficient, and there’s the possibility for name mismatches.
So I switched all of these messages over to use Unity’s event system. Events are now specified in interfaces that derive from IEventSystemHandler, and any code that needs to receive a particular event implements the relevant interface. To send an event to a game object, I use Unity’s ExecuteEvents helper functions. I created a system that multiple game objects can register themselves with to receive a particular event, to allow for efficient event broadcasting.
UI events
Not to be confused with the event system, Unity also has something called UnityEvents. These are great for when you want to hook up event handlers to events in a scene or prefab, rather than via code. I found these perfect for my UI code, so I switched this code over from using C# events to instead use UnityEvents.
Code architecture
The GearBlocks code was long overdue for some reorganisation, in particular I wanted to divide all the modules up into relevant namespaces. This is really valuable because it can highlight bad or unexpected code dependencies, and helps enforce a clear code hierarchy. Once I did this I found one or two suspect dependencies that I had to fix, but nothing too bad fortunately. It definitely feels better to have the code nicely organised now!
Worm gears
Finally, last week I implemented worm gears in the game. Happily, my plan for how to set up the physics constraints for this worked out first time! The implementation still needs one or two tweaks, but I’m pleased with how it turned out. As part of this effort I also simplified the existing gear engagement code somewhat, which should make it slightly more efficient.
Something a little bit different in this post! I’ve many happy memories of countless hours messing around with LEGO Technic as a child, and I think this was certainly a huge inspiration for developing GearBlocks. So, seeing as it’s the 40th anniversary of LEGO Technic this year, I thought I’d pay tribute a little bit.
In 1977 the first Technic sets came out, although Lego hadn’t coined the term yet, they were known as “technical sets” (or “expert builder” in North America). There were only four sets in that first year, a forklift, tractor, helicopter, and car chassis. Only a basic selection of technical parts were available, but they set the foundation for everything that was to come, and many of those original parts are still used today.
853 car chassis
This was the largest and most complex model at the time, and featured functional steering, gearbox, and 4 cylinder engine. It was the first in a long line of car chassis flagship Technic sets that would come in later years.
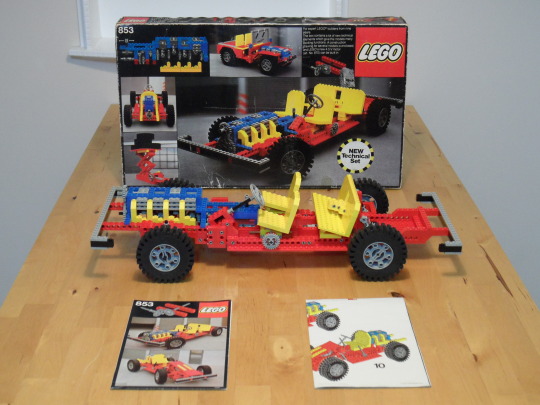
I wasn’t lucky enough to own one of these sets back in the day, but I did manage to pick one up on ebay a few years ago. It’s very basic by today’s standards, but definitely has a charm all of its own.
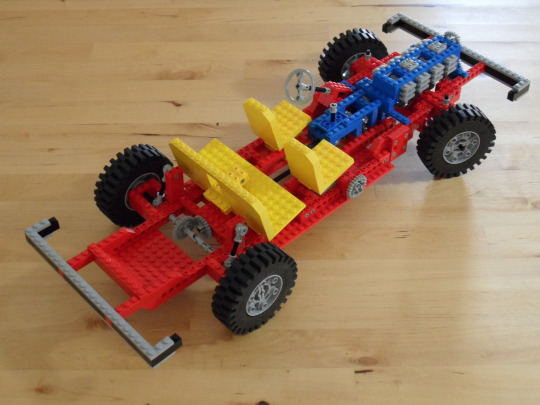
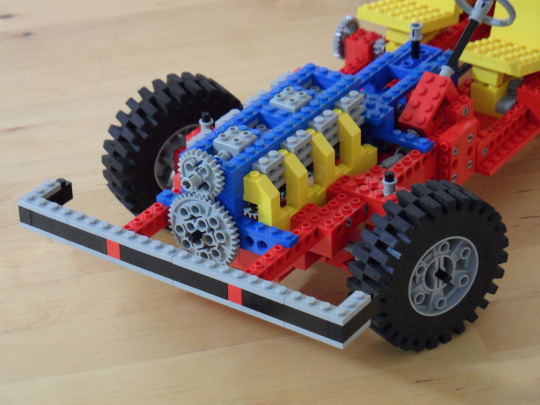
So happy anniversary LEGO Technic! OK, diversion over, time to get back to GearBlocks…
Highlighting a few things from the latest demo – how to use the configurable key bindings, and some updates to the lights and differential gear.
Well, at long last the new demo build is out!
SmashHammer Games
My company is now incorporated, SmashHammer Games is born! I’m still waiting on the accountant to do his part of the process, hopefully this will be sorted soon, but I don’t think this should hold me back from moving forward with the game
in the meantime.
Bugs and memory leaks
I was actually ready to release the demo a couple of weeks ago, but I was doing some last minute testing, and noticed some performance slowdowns in certain situations (for example, when highlighting a part). I also noticed some memory leaks and several bugs that I hadn’t spotted before, not good!
So I decided to hold off releasing it, to fix these issues first. This ended up requiring fairly significant refactoring and reworking of some of the code, so took quite a while unfortunately. Oh well, at least it’s done now!
Saved file location
The saved file locations have changed (they’re no longer in game folder). The new locations are:-
Saved games and constructions from the previous build (0.4.6095) should still load, but you’ll need to copy them into these new locations.
Here’s what I’ve been up to over the last couple of weeks. I’m still working on the company set up stuff, it’s unfamiliar territory for me, so I had to do a bit of research and get advice from some people. I won’t bore you with the details, but it seems there’s no getting around the complexities that require both an accountant and lawyer. This is going to cost me a lot of money, so I want to be sure before going ahead with it!
Upcoming demo
I’ll upload the demo update as soon as the company is sorted (should be soon now), but in the meantime, here’s a sneak peak at the changes that will be in it:-
As usual I’ve updated any parts that were already in the demo, but I’m not adding any additional ones, all the new parts I’m making are for the full game only!
Slopes and wedges
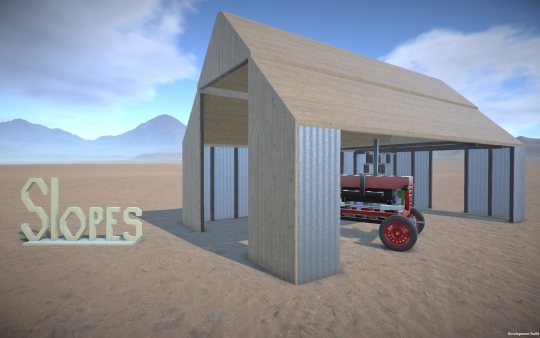
On the subject of new parts, I’ve now implemented resizable sloped beams and plates, as well as resizable wedge plates.
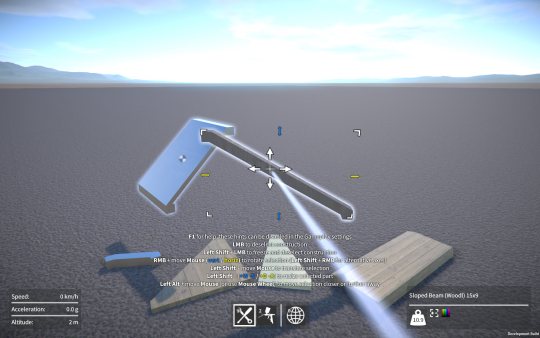
Designing their shapes was a bit of a challenge because I had to find a compromise between these three competing requirements:-
The wedge shape was the trickiest to represent with box colliders. I contemplated using a convex mesh collider for it, but I wanted to avoid this as they are generally less efficient for physics, and I also have part intersection tests in the game that only work for primitive colliders. So instead I created a system to dynamically add box colliders, three for the wedge edges, and then recursively adding more to fill in the wedge interior (the larger the wedge, the more interior colliders are needed). An example of this can be seen below.
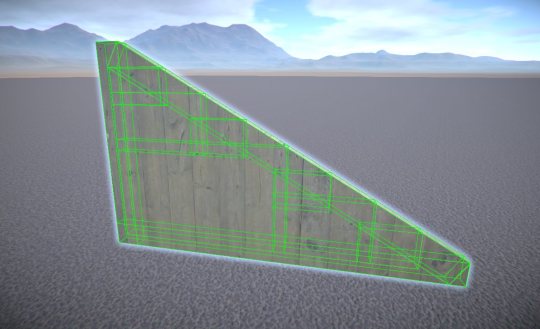
All resizable parts in GearBlocks use procedurally generated meshes, so I had to implement mesh generation for these new slope and wedge parts. This wasn’t too difficult but did require a fair bit of refactoring of my procedural mesh system to allow for these more intricate shapes.
Here’s a comparison of the Desert Buggy construction, the original version vs. one I made using the new slope and wedge parts.
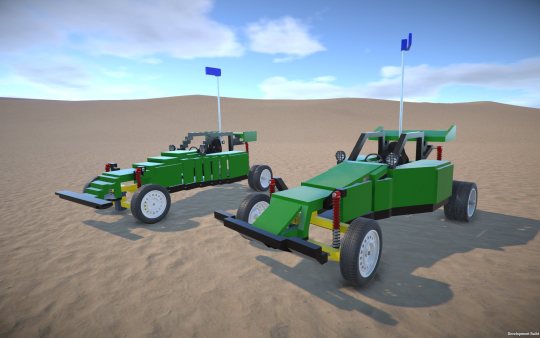
Not only does the slopes and wedges version look way better, it uses nearly 50 fewer parts than the original!
In the future I want to add a compound sloped plate (i.e. a “corner” piece), as well as curved beams and plates. The trouble is, the colliders for these will be even more tricky to set up. I might need so many box colliders to represent these shapes that it wouldn’t be practical, so I may well have to resort to convex mesh colliders for these. Anyway, something I’ll come back to later.
Construction interface problems
The sloped plate part is the first part in the game that is resizable along all three axes. Unfortunately this particularly highlights the awkwardness of the current part positioning and resizing interface. I’m not sure what I’m going to do about this yet, but I think I’ll have to revisit the construction controls yet again. There has to be a way I can make this better, but I’m just not seeing it right now!
So, um, that demo release I’ve been promising, where is it you might ask? The good news is, it’s ready to release (has been for a while actually). The last thing was to set up an installer for it and that’s all done now (if you’re wondering, I used Inno Setup for this, found it a super easy tool to use, with great results!)
Unfortunately, I can’t release it just yet as I’m still working on getting my company set up. This is turning out to be more complicated and expensive than I first realised. Incorporating the company itself is easy, but because I’ve already been developing GearBlocks for a while, I’ll need to transfer GearBlocks IP to the company, which complicates things and adds to the cost (accountant fees on top of the lawyer fees!) Anyway, I’ll keep plugging away at this and hopefully get it done in the next week or two.
In the meantime I’ve been adding more parts – some new sliding rack gears with integrated ball joints / hinges (makes for neater steering systems), more lights, and a seat. I’ve also implemented limited slip functionality in the differential gear, with configurable “locking strength”, should keep that wheel spin under control!
I plan on adding various types of sloped / curved beams and plates to the game, this will make constructions look a lot better (and save on the number of parts needed in a lot of cases). Next week I’ll start work on what should be the simplest of these, a resizable sloped beam.