
(Source: https://www.youtube.com/)
Tag: gearblocks
GearBlocks Demo 0.2.5682
Gear, motor and spring damper tweaks
This updated build brings increased motor torque and spring damper values, which should work better with larger, heavier constructions. It does mean however that you will probably have to tweak the spring damper settings in your existing constructions, as well as perhaps remove some motors if you’re currently doubling them up to increase torque.
I have also made some tweaks to reduce gear slip under high torque loads (in fact this is what allowed me to increase the motor torque).
This build also has a bunch of bug fixes (see the release notes for all the details), but one fix in particular affects motors. Depending on what order motors and axles were attached together, the motor rotation direction could be different. This has now been fixed so that the direction is always consistent, but it does mean that you may have to flip the reverse direction toggle in your existing constructions.
Block sizes and materials
Hey everyone, it’s been a while since my last update, sorry about that! For a long time I’ve wanted a better (& larger) selection of materials for the block / plate parts, as well as to allow their colour to be changed. I realised however, to facilitate this I need to redesign the part inventory system (otherwise the huge increase in parts would become unmanageable), and also to implement some kind of paint tool to change colours. I’m also thinking it might be better to have resizeable blocks / plates (and perhaps other parts where possible) to give more flexibility and reduce the number of parts cluttering up the inventory. This would be a fairly big change to implement, and has some awkward design implications for features I was hoping to add later on, so I want to be sure before I decide to go ahead with it.
So over the last few weeks I have been working on designing how this is all going to work. I have a way to go but I think I’m getting there. It has rather thrown my project plan off track though, so I need to try and get back on track.
Over the coming weeks I’ll be prototyping resizeable blocks, continuing with the design work, and hopefully making some progress on implementing the new systems. So things might continue to be a bit quiet while I work on this! In the meantime however, I have just released a new demo build with some improvements and bug fixes, details coming shortly…
GearBlocks Demo 0.2.5649
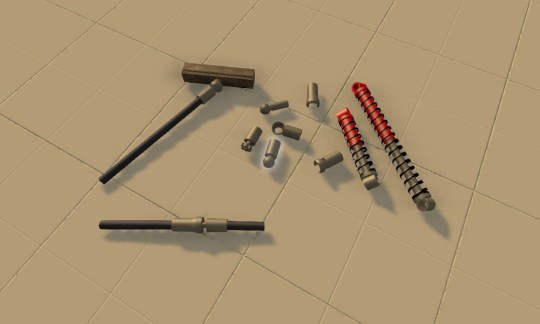
Spring dampers
The latest GearBlocks demo build now has coil-over spring dampers that can be used to build all kinds of suspension for your vehicles! The spring rate and damping can be adjusted through the part behaviour menu (accessed in the usual way, hover over and hold Shift + E).
I had the physics side working nicely early on, but it took a while to figure out the best way to present the spring / damper functionality to the player, within the constraints of my construction system. In the end I decided to have two parts, a “barrel” and a “piston” that the player fits together to form the spring damper unit. Originally I was hoping to provide a pre-assembled unit to avoid making the player do this, but it would have required too many changes to the construction system to allow for “multi-element” parts. Anyway, this way allows the barrel and piston to be attached in different orientations which is a bonus.
Now, actually using the spring dampers for something useful (like car suspension) might not be immediately obvious, so I’ll make a video soon to go over this.
Ball and Socket joints, CV joints
I have also just finished working on adding a whole new set of connecting joints to the game. There are ball and socket connectors that snap together and can attach to axles or blocks. They allow the connected parts to rotate through all three axes, and are essential for building a proper steering mechanism with a vehicle that has suspension, but they have many other uses too.
I’ve also added constant velocity joints, which attach axles together and allow rotational drive to be transmitted through changing angles. These are useful for building drive shafts for vehicles with suspension, and / or front wheel drive (or four wheel drive).
These parts are not available in the demo, as I’m keeping them back for the full game. I’ll be doing a video on these too though, to show how they can be used, it can get pretty complex!
GearBlocks Demo 0.1.5623
Full game features
Over the past couple of weeks I’ve been working on some new features: the challenge game mode and construction damage. These won’t be in the demo (got to hold some things back for the full game!) but I thought I’d talk about them so you know what I’ve been working on.
Right now the challenge mode just consists of built in saved games that you can choose from as starting scenarios. The plan is to extend this to add various possible constraints (e.g. a limited part budget) and scoring / win criteria. Eventually there will be a system where you earn points by completing challenges to unlock later, more advanced challenges. There’s still a long way to go on this feature!
I’ve also been working on my first attempt at a damage system. Each attachment starts with an initial “integrity” level based on the material strength of the two parts it joins. When a construction sustains impact, damage is propagated to its attachments, reducing their integrity level. Once an attachment’s integrity reaches zero it is deleted, causing parts of the construction to break off. Note that the parts themselves don’t get damaged or destroyed, only attachments; I decided to do it this way for simplicity.
UI improvements and bug fixes
There are still plenty of new things in the demo though, I have made some UI improvements (animated loading screen, saved game images, and other tweaks), plus a bunch of bug fixes. I’ll keep continuing to update the demo, wherever I improve or bug fix an existing feature. I’ll still be adding one or two new parts to the demo as well!
GearBlocks Demo 0.1.5605
UI upgrade complete
It took way longer than I was hoping, but finally I’ve completed the re-implementation of all the menus and screens using the new Unity UI system! This will hopefully pay dividends down the line by making it easier to add new features that require UI.
Unity 4.6 UI upgrade
Hey everyone, apologies for the lack of GearBlocks updates recently. I’ve been working on porting all of the menus and other UI over to the new UI system that was introduced in Unity 4.6. I wanted to get the port out the way sooner rather than later, before I add any new features that require UI changes or additions. Unfortunately it’s taken me much longer than expected, I’m getting there, but I probably still have one more week left to go on it.
Previously I was using the old immediate mode UI system, which has its well known limitations that I won’t go into here, I’m guessing it will eventually be phased out in future releases of Unity. The new system is for sure a lot more powerful and flexible, and of course you get to properly lay out your UIs in a WYSIWYG fashion.
Issues with the new UI system
Unfortunately once I got into it, I found there were some downsides to moving to the new system. For instance, some of the features of the immediate mode UI I was using (e.g. selection grids) do not come “built in” and I had to write additional code to replicate them. Also, some bits of the UI that I populate at run-time (e.g. the parts list in the inventory screen) required significant rework to the code that does the populating (simply because of the totally different philosophies of the old vs. new UI system). The most troubling issue though was the performance of the new UI system, I discovered if you’re not careful you can easily add many ms. to your frame time, with spikes in the hundreds of ms!
UI performance problems
GearBlocks has many separate UI screens that the user can transition between. The “standard” way to implement this in the new UI system (at least from the tutorials I’ve seen) is to use an animation controller to blend each screen between an open and closed state, these states setting the screen’s CanvasGroup visibility and interactibility. However I found that the animation blend added a couple of ms. (from Animator.Update and Canvas.BuildBatch) during a transition. Even worse, despite all screens (apart from the currently active one) being invisible and non-interactible), they still all seemed to get processed and I found that this resulted in several ms. of overhead from the EventSystem update.
To get around the transition blend cost, I did away with animations for the in-game UI and just did the transitions directly from code (I kept using animations in the main menu though as the performance cost isn’t so critical there). For the second problem, I wanted to eliminate any cost for a non-active screen – it’s not really practical to go through and disable each and every UI behaviour, so I tried deactivating the screen’s root GameObject. Unfortunately, while this does eliminate the continuous frame-by-frame cost, it can result in huge performance spikes when activating / deactivating the GameObject (I found hundreds of ms. if you have a complex screen with ScrollRects), so it’s not a viable option.
Luckily I found another solution, which is to have a separate Canvas and GraphicRaycaster for each and every screen, then enable / disable these to transition between screens. This way you get the best of both worlds, no cost for inactive screens, and no cost to activate / deactivate them. I get the impression this is a common trick people use to get around this problem. It seems like there are a few performance tricks people are discovering (such as disabling Canvas “pixel perfect” when using ScrollRects).
Well, hopefully I’ll be done with the UI port soon, and then I can get back to adding new stuff to the game!